Fitting Guide for Curtains
Pencil Pleat Curtains
Identify the left and right hand curtains ensuring that the join in the curtains is on the outer edge (fig 1). Tie the header tape cords on the inner edge of the curtain and pull the header tape cords from the outer edge evenly to create the pleats. Tie the header tape cords on the outer edge and secure behind the header tape, do not cut the header tape cords.
Insert the hooks evenly along the header tape. If fitting to a curtain track use the middle or bottom pencil pleat tape (fig 2 B or C), if fitting to a curtain pole use the top pencil pleat tape (fig 2 A). Once both curtains have been gathered and hooks inserted, your curtains are ready to hang.
Pinch Pleat Curtains
Identify the left and right hand curtains ensuring that the join in the curtains is on the outer edge (fig 1). Pinch Pleat curtains will arrive with stab hooks already in position for fitting to a pole. If fitting to a track, you will need to re-align the hooks. Identify where the stab hooks need to be positioned so that the track is covered by the curtain, usually 9cm from the top of the curtain (fig 3). Ensure the stab hooks do not go through the face of the fabric when re-positioning. Your curtains are now ready to hang.
Eyelet Curtains
Identify the left and right hand curtains ensuring that the join in the curtains is on the outer edge (fig 1). Eyelet curtains are supplied and secured into pleats. Simply slide each curtain onto the pole ensuring the last eyelet is between the finial and the first bracket securing the pole.
.
Fig 1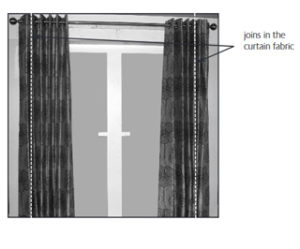
Fig 2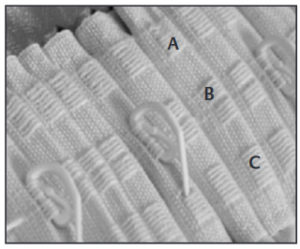
Fig 3