FAQs

Frequently Asked Questions


If the PVC slats on your vertical blind are sticking together due to static, there are several simple methods you can try to help reduce the static electricity and prevent the slats from sticking together:

  • As a first step, we recommend wiping the slats with a clean, damp cloth to help dissipate any static build-up. Please avoid using harsh cleaning products, as these may damage or affect the PVC surface.
  • If the static persists, a dryer sheet can be gently rubbed over the affected areas to help reduce static.
  • Alternatively, you can mix 1 part liquid fabric softener with 4 parts warm water in a spray bottle or small bowl. Lightly spray the solution onto the slats, or dampen a clean microfibre cloth with the mixture. Then gently wipe both sides of each PVC slat.

Before applying the fabric softener solution or using a dryer sheet, we recommend testing it on a small, inconspicuous area first to ensure there is no adverse effect on the appearance or finish of the PVC.
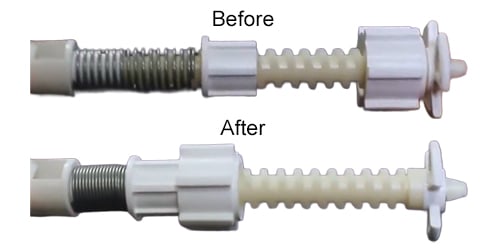

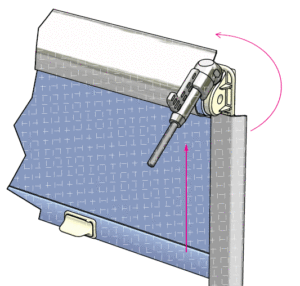
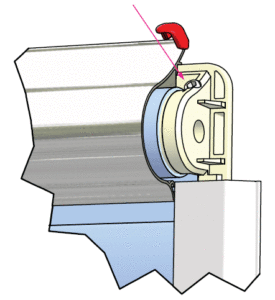
If your Soft Rise spring-operated roller blind does not fully extend, or you’re experiencing difficulty when raising the blind, the Soft Rise spring may simply need to be reset. You can usually resolve this by following the steps below.

  • Push in the locking pin on the spring end and remove the blind from the brackets.
  • Pull out the idle end (the end opposite the spring).
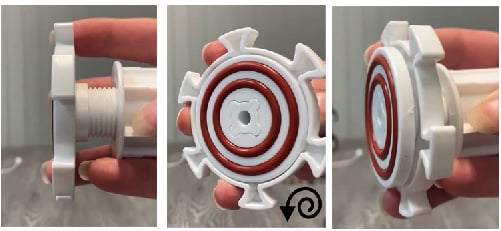
  • Rotate the stop wheel to compress the spring and reset its position.
  • Reinsert the idle end into the barrel.
  • Refit the blind into the brackets.
  • Pull the spring locking pin to the out position.
  • Test the blind to check that it now extends fully.

If the blind still does not operate correctly after following these steps, please get in touch and we’ll be happy to help.

If your Perfect Fit Venetian Blind will not stay in position when raised, follow the steps below to add tension.

  1. Remove the blind from the window and lay it face down.
  2. Loosen the screw underneath the bottom frame that is holding the cord.
  3. Pull the cord that is going through the barrel until the spring is stretched.
  4. Re-tighten the screw so that the cord is secure. This will ensure that it doesn’t slip back through the barrel.
  5. Re-fit the blind and operate to check that the tension is correct.
  6. Leave the blind in the up position to make sure the blind doesn’t slip down; if this occurs, more tension is required.

If you’d like to change the roll direction, it’s simple to do. Pull the chain to lower the blind and keep pulling until the metal tube is fully visible. Continue pulling and the blind will start to rise, with the fabric now rolling over the front of the tube.

If insufficient tension is achieved to secure the blind in the recess, firstly check that the recess width matches the measurement ordered.  If the width matches, check that the end of the tensioner is wound out from the body of the tensioner. Note: Twist the tensioner thoroughly when installing. It requires more turns than expected before it engages and latches into the fitting.

If the chain connector fouls with the blind before the blind is fully lowered or raised, please follow the steps below;

  • Remove the blind from the brackets and pull out the sidewinder.
  • Squeeze the two prongs on the sidewinder together and push into the body of the sidewinder to access the chain.
  • Remove the chain and reposition so the connector is close to the sidewinder at the back of the loop for a standard roll finish (roll down the back), and the front of the loop for a reverse roll finish (roll down over the front).
  • Squeeze the sidewinder back together and push the sidewinder back into the blind.
  • If not already done, roll the blind up by hand.
  • Refit the blind to the brackets and test.

Prefer to watch a video, click here: How to Adjust Your Chain Connector for a Grip Fit Blind


The stack depth of vertical blinds depends on the overall blind width and the chosen opening style, either single draw or split draw. The table below provides stack measurements for both single and split draw configurations, specifically for cord-operated vertical blinds. For split draw blinds, it also details the stack depth on both the control and idle sides.

If the blind width required is not displayed, round up to the next available size for a single or split draw as needed.

Measurements are based on blinds with 89mm louvres. For blinds with 127mm louvres, please reduce the stack measurements by approximately 15%.

All dimensions are given in millimetres (mm) and are intended as a general guide only, as actual sizes may vary slightly.

Blind Width (mm) No. of Louvres Single Stack (mm) Split Stack Total (mm) Split Stack Control Side (mm) Split Stack Idle Side (mm)
413 5 123
492 6 135 183 99 84
572 7 147
651 8 159 207 111 96
730 9 171
810 10 183 231 123 108
889 11 195
968 12 207 255 135 120
1048 13 219
1127 14 231 279 147 132
1207 15 243
1286 16 255 303 159 144
1365 17 267
1445 18 279 327 171 156
1524 19 291
1603 20 303 351 183 168
1683 21 315
1762 22 327 375 195 180
1842 23 339
1921 24 351 399 207 192
2000 25 363
2060 26 375 423 219 204
2159 27 387
2238 28 399 447 231 216
2318 29 411
2397 30 423 471 243 228
2477 31 435
2556 32 447 495 255 240
2635 33 459
2715 34 471 519 267 252
2794 35 483
2873 36 495 543 279 264
2952 37 507
3031 38 519 567 291 276
3110 39 531
3189 40 543 591 303 288
3268 41 555
3347 42 567 615 315 300
3429 43 579
3508 44 591 639 327 312
3588 45 603
3667 46 615 663 339 324
3746 47 627
3825 48 639 687 351 336
3905 49 651
3984 50 663 711 363 348
4064 51 675
4143 52 687 735 375 360
4222 53 699
4302 54 711 759 387 372
4381 55 723
4460 56 735 783 399 384
4540 57 747
4619 58 759 807 411 396
4699 59 771
4778 60 783 831 423 408
4858 61 795


A small selection of roller blind fabrics can be joined to achieve a larger size.  If a join is possible, the details will be displayed in the product description.  Joins are always horizontal and positioned as close to the top of the blind as possible.  To achieve a join two pieces of the roller fabric are overlapped and then stitched or bonded, depending on the fabric.  The image below shows a roller join on a plain blue fabric.

Perfect Fit Venetian, Pleated and Wooden Blinds project 10mm away from the window frame.  Perfect Fit Roller Blinds project 60mm at the top to accommodate the roller tube and 10mm at the sides and bottom.  These measurements are based on the Perfect Fit frame fitting flush to the window frame. The height of the Perfect Fit Roller Blind fascia at the top is 75mm.

Deluxe Roman Blinds

Drop Stack
544mm 220mm
894mm 230mm
1244mm 240mm
1594mm 250mm
1944mm 260mm
2294mm 270mm
2500mm 280mm

All sizes are approximate

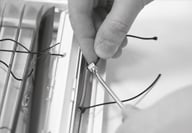
If the Perfect Fit Pleated Blinds will not stay up, additional tension is required. To add tension please follow the steps below;

  • Remove the blind from the window and lay face down.
  • Remove the shoe tab securing the cord to the bottom of the Perfect Fit frame.
  • Inside the shoe a shim can be moved to increase the tension to the cord.
  • Refit the shoe to the bottom of the Perfect Fit frame and repeat the process on the opposite side.
  • If additional tension is required, the cord can be re-knotted to the shoe shim shortening the cord length thus increasing the tension further.

Please ensure the blind is operating as required before cutting any excess cord off.

Aluminium Venetian Blinds 25mm Slat

Blind Drop Stacking Height
500mm 45mm
1000mm 65mm
1500mm 85mm
2000mm 100mm

Aluminium Venetian Blinds 50mm Slat Width

Blind Drop Stacking Height
500mm 65mm
1000mm 90mm
1500mm 105mm
2000mm 120mm

Wooden Venetian Blinds 50mm Slat (+10% for tapes)

Blind Drop Stacking Height
500mm 110mm
1000mm 155mm
1500mm 200mm
2000mm 245mm
2500mm 290mm
3000mm 450mm

All sizes are approximate

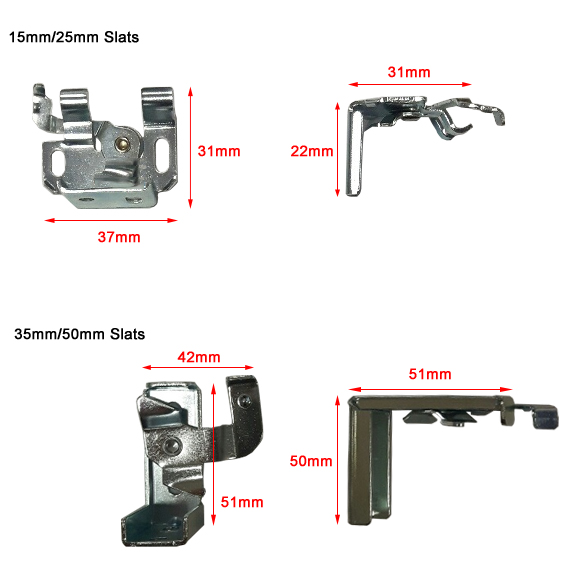
We offer two types of Aluminium Venetian Blind brackets, one for 15mm/25mm slats and one for 35mm/50mm slats.  Please find the image below for reference;

The following lists include the recommended tape colours for a selection of Wooden and Faux Wooden Venetian Blinds;

Wooden Venetian Blinds

Slat
Tape
Pure Cotton
Polar Chalk
Capella Cotton
Morena Mist
Kalm Lunar
Ash Steel
Khol Gallant
Carbon Jet
Oregon Hessian
Honey Toffee
Barsa Static
Auburn Coffee
Cordia Light Beige
Tuscan Oak Toffee
Fired Walnut Coffee
Jarrah Jet
Koa Mist
Revera Lunar
Nordic Mist
Narra Oak Hessian
Oska Mist
Perla Vanilla
Gloss Pure Cotton
Starwood Glacier Arctic
Starwood Divine Linen
Starwood Marlin Solis
Starwood Pavilion Shadow
Starwood Empire Dusk
Starwood Volt Smoke
Starwood Soho Canvas
Starwood Bali Husk

Faux Wooden Blinds

Slat Tape
Abyss Static
Amber Toffee
Arctic Oak Chalk
Aura Gloss White Cotton
Chroma Jet
Desert Oak Hessian
Linara Barley
Linara Fine Grain Barley
Lunar Oak Lunar
Mirage Chalk
Mirage Fine Grain Chalk
Mission Lunar
Mission Fine Grain Lunar
Orion Gallant
Orion Fine Grain Gallant
Scandi Oak Dove
Serene Cotton
Serene Fine Grain Cotton
True Cotton
True Fine Grain Cotton
Alina Tranquil
Alina Fine Grain Tranquil
Allura Oak Arctic
Dream Arctic
Dream Fine Grain Arctic
Realm Noble
Realm Fine Grain Noble


The tension for Perfect Fit Roller Blinds can be adjusted by increasing or decreasing the “wrap tension”.  Please follow the steps on page five for the Perfect Fit Roller Blinds measuring and fitting instructions found here or follow the steps below.

For the fabric to roll up, we need to add ‘wrap tension’ at the top of the blind.

1. Pull down the blind (do not manually push back up as it needs to raise naturally with the tension)

2. Carefully insert a 4mm allen key or angled allen drive attachment (R9002 as shown) into the hexagon slot in the control end, being careful not to push the screw out.

3. Turn ‘anti-clockwise’ to add tension until the blind starts to lift.

4. Tension is complete when the blind is fully opened.

5. Push the worm retaining clip into the hexagon slot to secure the tension.

Ensure the bottom bar end caps are positioned in the Perfect Fit frame channel furthest from the window.

Perfect Fit Roller Blinds are operated by tilting the bottom bar back to raise/lower the blind and setting the bar straight to lock.  The end caps compress within the channel to secure the blind at the required level.

Please note if the bottom bar end caps are not sliding within the channel furthest from the glass the blind will not hold.  The image below highlights (red section) the correct channel the bottom bar end caps should slide within.  The bottom bar can then be tilted to raise/lower the blind;

If your spring operated roller blind will no longer retract, follow the steps below to re-tension the spring;

Faber System

  • With the blind installed in the brackets pull the blind down approximately 30cm.
  • Remove the blind from the brackets and roll the blind up by hand.
  • Refit the blind and check for tension.
  • The above steps may need to be repeated several times to achieve the required tension, being careful not to over tension

Alternatively;

  • Remove the blind from the brackets.
  • Insert a screwdriver into the cross-end (spring end) and turn to tension the spring, being careful not to over tension.
  • Ensure the spring locks off before removing the screwdriver.
  • Refit the blind.
  • If additional tension is required, repeat the steps above.

Louvolite System

  • When the blind is pulled down, push the front locking pin in.
  • Gently remove the blind from the brackets and roll back up by hand.
  • Refit the blind in to the brackets noting the correct fitting position as indicated on the end of the blind.
  • Pull the locking pin to the out position being careful not to fully remove the pin.
  • Pull the blind down to check tension.
  • If additional tension is required repeat the steps above.

Additional tension can be added by following the brief instructions below;

  • Remove the blind form the window and lay face down.
  • At the bottom of the blind, undo the cord from one side of the spring.
  • Pull a small amount of cord through and re-tie to the spring.
  • Refit the blind.

Following the steps above adds additional tension to the spring which in turn tensions the cord to keep the blind in place when raised.  If this does not resolve the issue found please contact our sales team.

Due to the nature of fabric dyes and natural materials an exact match is not always possible.  We do however endeavour to guarantee multiple blinds of the same style and colour are within the same batch.  Wooden Blinds alike due to their natural characteristics can vary in shades.

In the unlikely event your blind does not measure the exact size you requested, please get in touch and we will endeavour to rectify any problems as quickly as possible.

Please note that any recess measurements given when ordering will have a set amount deducted.

Regrettably, we can not exchange or refund any blinds which prove to be the correct size unless faulty or damaged.

SoEasy Blinds offers a free swatch sample service across our vast range of products to ensure the fabric chosen is to your requirements.  We will send up to 8 samples of any blind type to help make your decision when buying from SoEasy Blinds.  All samples are sent via Royal Mail First Class to ensure you receive your swatch as quickly as possible.

To request your free sample simply click your chosen fabric and then click the “Order Free Sample” button.  This will add the free sample to your basket where you can continue to enter your delivery details.  If required, more than one sample can be ordered at once.

Regrettably we can not offer our sample service across the VELUX product range and a selection of other fabrics.

A selection of blinds can be upgraded to our expedited service by selecting the option on the basket screen.  Orders received Monday – Friday before 10:30am will be moved to the front of the production line and dispatched within 24hrs and delivered within 48 working hours.  Orders placed on a weekend or bank holiday will be processed the next working day and dispatched within 24hrs for delivery within 48 working hours.

Examples:

Order Placed
Order Delivered
Monday before 10:30am Tuesday/Wednesday
Saturday before 10:30am Tuesday/Wednesday
Bank Holiday Monday before 10:30am Wednesday/Thursday
Monday after 10:30am Wednesday/Thursday


Please note, this service is only available for blinds which appear with this option.  Orders placed with a mixture of delivery types will not be available with this option.

Please be aware that we are unable to offer this service to the following areas; Scottish Highlands, Isle of Man, Channel Isles and Northern Ireland

If you have any questions concerning our next day service please get in touch via our contact page.

Yes, all customers can change the delivery address if required when completing the order process online.

We operate a standard delivery service to anywhere within the United Kingdom plus a FastTrack service for selected marked products.  To see our delivery charges view our delivery information page.

SoEasy Blinds aims to delivery all orders within the stated lead time for your chosen product at the time of ordering.  Please add your chosen blind to the basket to view delivery times.  Deliveries are made between 9am and 5pm, Monday to Friday by courier.

This problem can be quickly rectified by removing all louvres from the headrail and then tilt the hangers 90º to the window using the control chain at the end of the blind.  Rehang the louvres in the open position, the blind will now open and close as required.

Simply close the blind fully and tilt the louvres so you can not see out of the window.  Continue to pull the tilt chain to realign the carriers.  You may hear a slight clicking noise when this realignment is performed which is completely normal.

To convert inches (“) to millimetres (mm), simply multiply by 25.4. Example: 48” = 1219mm.

To convert centimetres (cm) into millimetres (mm), simply multiply by 10. Example: 100cm = 1000mm.